

Pete's Projects
Some of the items presented are self contained, a finished product. Others, essentially in the form of kits require you to add some components.
There are two main key elements.
1. 19mm square aluminium tubing. Available across the country from local hardware supplies or aluminium suppliers. Just make sure it is 19mm square as there is also a 20mm square available, and this will not work.
You will need to cut it to length to suit your individual requirements, and in most cases drill one, two, or a series of holes.
Please take the time to cut, and drill it properly, not to distort the tubing by drilling with blunt drills and or by applying excessive force. I suggest using a step drill (pictured) as this is ideal for clean holes in thin material.The components that will interact with the tubing have been sized to be a neat, positive fit with the tubing. So be sure to deburr the holes and cuts, as well as creating a chamfer on the ends and corners of the tubing. I suggest you then sand over the tubing with fine wet and dry on a sanding block to remove and final burrs, this will highlight any distorted areas. Finish off by giving the tubing a coat of beeswax polish.

2. Threaded inserts. These little beauties are fantastic, and my advise is go berserk, these little wonders are great. Available in most hardware stores, they, along with there matching "Bolts" are often referred to as "furniture connectors" and will be found in that area, not with your normal bolts. You need a supply of the connector bolts, the 40mm length is the closest to what you want, as it has the tread running most of the way up the shaft. Some items like the 3rd Hand model cradle and Ro-Tate-Me fuselage jig can use these full length, most other item will require them to be cut down to a bout 20mm. I am looking for a supply of this bolt with the same head design in that length but so far no luck. So, you will have to spend an hour of so with an angle grinder customising the 40mm ones. Be sure to clean and check the treads to make sure they work correctly.
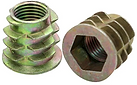

To install, after marking out a grid, I suggest you drill pilot holes of around 2mm, then using an 8mm drill bit (brad point) enlarge the hole. The inserts are designed to be flush when screwed in ( they cut there own thread), but I recommend slightly countersinking them, you want them to be flush, or slightly below the surface. I have found that a round Burr as pictured does a great job, or a round or conical grindstone.


3. Threaded rod. The last item is 6mm threaded rod, this will be used in some of the hold down, and clamping items, and again, is available at hardware stores across the country.
The use of these common item has greatly influenced the final design of many of the products I'm now able to present.